Welcome to part 3 of my 4-part series on How To Take Amazing Photos of Yourself…For Free.
If you missed part 1 on color schemes and wardrobe or part 2 on finding the perfect location, click the links to go back.
In part 3 I am going to cover the importance of good lighting.
Lighting is everything.
If you have a fancy camera and poor lighting, your photos will not look good. But if you have a cheap camera and beautiful lighting, your photos will look terrific.
But don’t let this overwhelm you. There are just a few rules to follow, and your photos will be fabulous!
The Golden Hour
As I mentioned in part 2, avoid indoor photographs if possible.
If you are taking photos outdoors, do not take photos in the middle of the day. The sun is too harsh, your eyes will be squinty and you will have shadows on your face.
Take your photos within one hour from sunset. This is called “The Golden Hour”. The sunlight at this time isn’t so harsh, you can fully open your eyes and your face/skin will glow (blemishes and wrinkles will nearly disappear).
Go to Google and type in “time of sunset today (city)(state)”. If sunset is at 7:53pm then aim to be at your location ready to take your first photos at 6:45pm.
Always face towards the sun when having your photos taken. If your eyes hurt looking towards the camera at this time, then give it a few more minutes.
Quick Tip: Whoever is taking your photos, instruct them to click click click click click and take rapid fire photos of yourself. You can even set your camera to sports mode and tell them to just hold down the button and the camera will auto-click.
You want to have hundreds of photos of yourself in all sorts of poses and facial expressions. If you don’t instruct the photographer to click click click click click then they will hesitate and you will only get a few photos.
Below are examples of two photos of me and my husband Daniel. Do you see how the photo on the left our eyes are almost glued shut? This photo was taken in harsh light.
The photo on the right was taken just before sunset. You can actually see our eyes!


Light and Bright Photos
Have you ever wondered how people make their photos pop with bright light? It’s actually very quick and easy…and it’s free!
Take a look at these photos side by side. The original photo is on the left. The edited photo is on the right. Wow, what an amazing difference, right?


To create light and bright photos, follow these steps:
- Download the LIGHTROOM APP (it’s free!) on your iPhone. Look for this logo:

- If your original files of your photos are on your computer, email them to yourself. Then open that email on your phone and save the photos on your phone. Then share the photos you want to brighten to Lightroom.
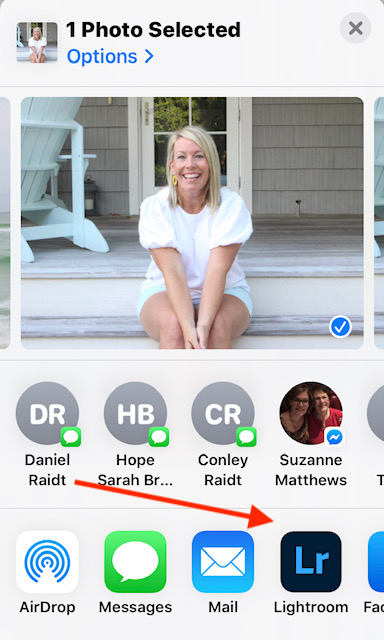
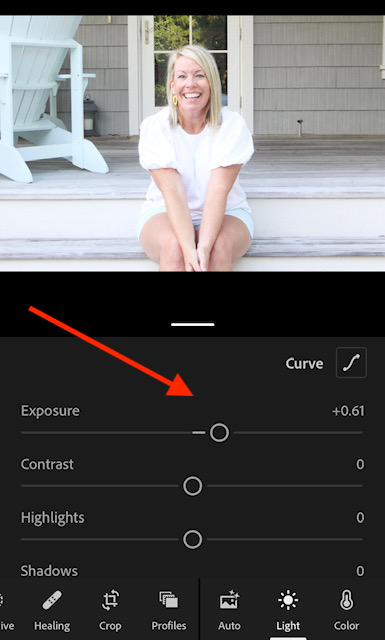
Once you open the photo in Lightroom, select “light” in the bottom right corner

Then at the top where you see “Exposure”, slowly drag the circle to the right. You will see your photos instantly brighten! Once you get the exposure you are happy with, tap on the “share” icon at the top of the screen and either save it to your phone’s camera roll or email it to yourself.
Other features to play around with in Lightroom
Click on “color”, select the color wheel. If you want the grass in your photo brighter or softer, click on the green circle and adjust the green tone.
If you have a pink purse or accessory you want to pop, click on the pink circle and make it pop.
You can also play around with “Highlights” and “Shadows” to give your photo more contrast so it’s not too over-exposed.
That’s it! Super easy, right?
As my daughter recently said, “Lightroom is my mom’s third child”. Ain’t that right! 🙂
In summary, remember The Golden Hour and take your photos outdoors one hour before sunset. And use the Lightroom app to make your photos bright and beautiful.
If you remember those two simple rules, you will create professional-grade photos!
____________________________________
What did you learn in this article? What can you apply immediately to your photos to make them look more professional? Drop a comment below!